![]()
This is the print version of this page. All content is copyright Indezine.com 2000-2026.
![]()
Definitions and resources for terms and techniques used in the world of presentations
See Also:
PowerPoint and Presenting Notes
PowerPoint and Presenting Glossary
Presentations Glossary in alphabetical order:
A |
B |
C |
D |
E |
F |
G |
H |
I |
J |
K |
L |
M |
N |
O |
P |
Q |
R |
S |
T |
U |
V |
W |
X |
Y |
Z
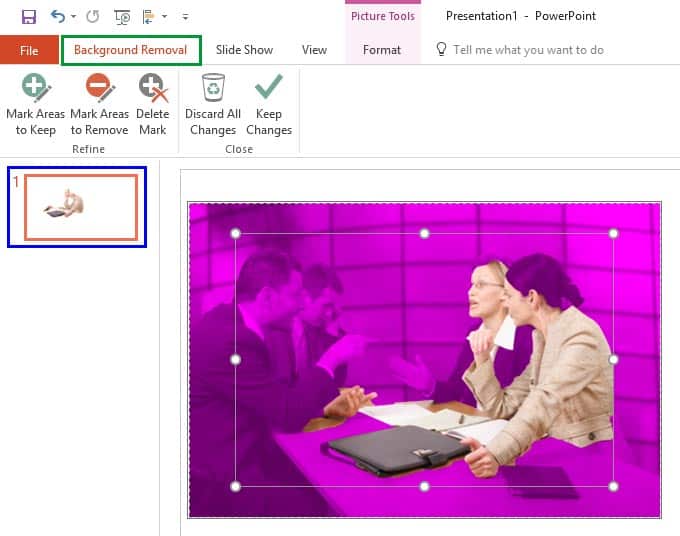
PowerPoint’s Remove Background option lets you remove the background from an inserted picture. This can be a great feature if you want to remove the sky, a wall, any backdrop, or something else in a photograph so that the slide background shows through as transparent within the removed parts of the picture.
To learn more, choose your version of PowerPoint. If we do not have a tutorial for your version of PowerPoint, explore the version closest to the one you use.
Remove Background from Pictures in PowerPoint 2016
Remove Background from Pictures in PowerPoint 2013
Remove Background from Pictures in PowerPoint 2010
Remove Background from Pictures in PowerPoint 2011
Tutorial Code: 09 05 01
Previous: 09 04 03 Reposition Picture Fills within Crop in PowerPoint
Next: 09 05 02 Advanced Background Removal Options for Pictures in PowerPoint
Filed Under:
P
Tagged as: 09-05, Pictures - Appearance, Pictures and Visuals, PowerPoint Tutorials
Comments Off on Pictures – Appearance: Remove Background from Pictures in PowerPoint
The most often used view (and this is the default view in PowerPoint as well) is Normal view that displays one slide at a time in the Slide Area. Normal view is great for editing individual slides, and shows PowerPoint’s typical tri-pane interface that includes the Slides Pane, the Slide Area, and the Notes Pane.
Filed Under:
V
Tagged as: 01-07, Interface and Basics, PowerPoint Tutorials, Views
Comments Off on Views: Normal View (Editing View) in PowerPoint
To make a visually strong PowerPoint presentation, you should use shapes and pictures. You can also fill your shapes with pictures. Maybe sometimes you end up with not so desirable results. Primarily, you’ll find that PowerPoint insists on filling the entire picture within the shape. In the process, the picture itself may appear distorted.
To learn more, choose your version of PowerPoint. If we do not have a tutorial for your version of PowerPoint, explore the version closest to the one you use.
Reposition Picture Fills within Crop in PowerPoint 2016
Reposition Picture Fills within Crop in PowerPoint 2013
Reposition Picture Fills within Crop in PowerPoint 2010
Reposition Picture Fills within Crop in PowerPoint 2011

Tutorial Code: 09 04 03
Previous: 09 04 02 Crop Picture to Shape in PowerPoint
Next: 09 05 01 Remove Background from Pictures in PowerPoint
Filed Under:
P
Tagged as: 09-04, Pictures - Cropping, Pictures and Visuals, PowerPoint Tutorials
Comments Off on Pictures – Cropping: Reposition Picture Fills within Crop in PowerPoint
While you can conventionally crop pictures in PowerPoint to a rectangular constraint, you can also opt to use another shape to crop instead. This tutorial explains the Crop to Shape option that lets you choose non-rectangular cropping shapes for your pictures; the results tend to look like a picture contained within a shape.
To learn more, choose your version of PowerPoint. If we do not have a tutorial for your version of PowerPoint, explore the version closest to the one you use.
Crop Picture to Shape in PowerPoint 2016
Crop Picture to Shape in PowerPoint 2013
Crop Picture to Shape in PowerPoint 2010
Crop Picture to Shape in PowerPoint 2011

Tutorial Code: 09 04 02
Previous: 09 04 01 Crop Pictures in PowerPoint
Next: 09 04 03 Reposition Picture Fills with Crop in PowerPoint
Filed Under:
P
Tagged as: 09-04, Pictures - Cropping, Pictures and Visuals, PowerPoint Tutorials
Comments Off on Pictures – Cropping: Crop Picture to Shape in PowerPoint
Cropping an area of a picture removes extraneous areas, and lets you add focus to the areas of the picture that are appropriate to the topic of your presentation. The Crop tool lets you achieve these edits and more. Cropping works with both pictures that are inserted on slides, or with pictures that constitute a shape fill.
To learn more, choose your version of PowerPoint. If we do not have a tutorial for your version of PowerPoint, explore the version closest to the one you use.
Crop Pictures in PowerPoint 2016
Crop Pictures in PowerPoint 2013
Crop Pictures in PowerPoint 2010
Crop Pictures in PowerPoint 2011

Tutorial Code: 09 04 01
Previous: 09 03 02 Set Document Resolution in PowerPoint
Next: 09 04 02 Crop Picture to Shape in PowerPoint
Filed Under:
P
Tagged as: 09-04, Pictures - Cropping, Pictures and Visuals, PowerPoint Tutorials
Comments Off on Pictures – Cropping: Crop Pictures in PowerPoint
Microsoft and the Office logo are trademarks or registered trademarks of Microsoft Corporation in the United States and/or other countries.