![]()
This is the print version of this page. All content is copyright Indezine.com 2000-2026.
![]()
Definitions and resources for terms and techniques used in the world of presentations
See Also:
PowerPoint and Presenting Notes
PowerPoint and Presenting Glossary
Presentations Glossary in alphabetical order:
A |
B |
C |
D |
E |
F |
G |
H |
I |
J |
K |
L |
M |
N |
O |
P |
Q |
R |
S |
T |
U |
V |
W |
X |
Y |
Z
To begin, let’s start with the basics. What are Guides in PowerPoint? Consider Guides as individual lines from a grid on your slide that you create. Every single Guide can be moved, added, or deleted. Guides also have snap options that are always on. Once the Guides are made visible on the slide, all objects that venture close enough to them just snap. Along with Rulers and Gridlines, Guides help you position your slide objects with more precision, and you can make them work for you.
Filed Under:
W
Tagged as: Interface and Basics, PowerPoint Tutorials, Working with Slides
Comments Off on Working with Slides: Working with Guides in PowerPoint
Once you have made Guides visible on your PowerPoint slides, they show up in the same position on all other slides within the presentation. You’ll find that only two Guides, one horizontal and one vertical Guide are visible at first, and these two Guides intersect at the center of the slide. Most of the time, this might work for you, but you can actually add more Guides since these can help in positioning slide objects better across successive slides.
Filed Under:
W
Tagged as: Interface and Basics, PowerPoint Tutorials, Working with Slides
Comments Off on Working with Slides: Adding More Guides in PowerPoint
Applying preset motion paths or even drawing custom motion paths are not the only tricks you can master. Several other tricks that can help you become a better PowerPoint animator. The simplest Motion Path trick is to reverse them! This option is very helpful if you want an object to animate using a Motion Path, and then animate it again from the end of the motion path to the beginning!
To learn more, choose your version of PowerPoint. If we do not have a tutorial for your version of PowerPoint, explore the version closest to the one you use.
Reversing Paths of Motion Path Animations in PowerPoint 2016
Reversing Paths of Motion Path Animations in PowerPoint 2013
Reversing Paths of Motion Path Animations in PowerPoint 2010
Reversing Paths of Motion Path Animations in PowerPoint 2007, 2003, and 2002
Reversing Paths of Motion Path Animations in PowerPoint 2011

Tutorial Code: 13 02 04
Previous: 13 02 03 Drawing Custom Paths for Motion Path Animations in PowerPoint
Next: 13 02 05 Open and Closed Motion Paths in PowerPoint
Filed Under:
M
Tagged as: 13-02, Animations and Transitions, Motion Path Animations, PowerPoint Tutorials
Comments Off on Motion Path Animations: Reversing Paths of Motion Path Animations in PowerPoint
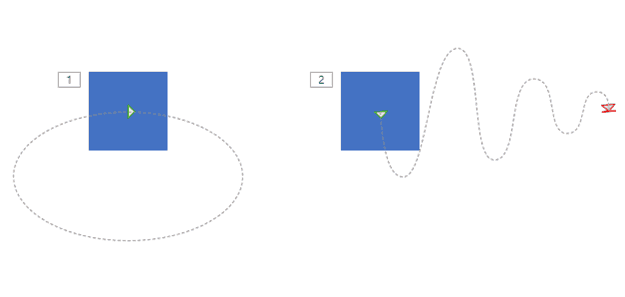
Motion paths are paths (or lines) through which slide objects animate. These motion paths are like any other line with curves, points, etc. If you are familiar with the Line, Curve, Scribble, and Freeform drawing tools in PowerPoint, you know that paths can be either open or closed. A circle is a good example of a closed path, whereas an arc is an open path. So, how is the concept of open and closed paths relevant to Motion Path animations in PowerPoint?
To learn more, choose your version of PowerPoint. If we do not have a tutorial for your version of PowerPoint, explore the version closest to the one you use.
Open and Closed Motion Paths in PowerPoint 2016
Open and Closed Motion Paths in PowerPoint 2013
Open and Closed Paths in Motion Path Animations in PowerPoint 2010
Open and Closed Motion Paths in PowerPoint 2007, 2003, and 2002
Open and Closed Motion Paths in PowerPoint 2011
Tutorial Code: 13 02 05
Previous: 13 02 04 Reversing Paths of Motion Path Animations in PowerPoint
Next: 13 02 06 Lock and Unlock Paths for Motion Path Animations in PowerPoint
Filed Under:
M
Tagged as: 13-02, Animations and Transitions, Motion Path Animations, PowerPoint Tutorials
Comments Off on Motion Path Animations: Open and Closed Motion Paths in PowerPoint
All slides within PowerPoint are based on one of the available Slide Layouts. These layouts can be chosen when you add a new slide or you can even change the layout of your existing slides. Both these options are accessible from the Home tab of the Ribbon. While these available layouts seem to cover most types of slides, you may sometimes want to create a new layout based on your individual requirements. That’s when you will want to know how you can duplicate, rename, and edit existing Slide Layouts.
Filed Under:
S
Tagged as: 04-07, PowerPoint Tutorials, Slide Master and Slide Layouts, Themes Templates Masters and Layouts
Comments Off on Slide Master and Slide Layouts: Duplicate, Rename, and Edit Slide Layouts in PowerPoint
Microsoft and the Office logo are trademarks or registered trademarks of Microsoft Corporation in the United States and/or other countries.