![]()
This is the print version of this page. All content is copyright Indezine.com 2000-2026.
![]()
Definitions and resources for terms and techniques used in the world of presentations
See Also:
PowerPoint and Presenting Notes
PowerPoint and Presenting Glossary
Presentations Glossary in alphabetical order:
A |
B |
C |
D |
E |
F |
G |
H |
I |
J |
K |
L |
M |
N |
O |
P |
Q |
R |
S |
T |
U |
V |
W |
X |
Y |
Z
If you explore how people use PowerPoint, you will discover that people are successful finding options that are intuitive and easy-to-discover. They fail when options are hidden in drop-down menus or dialog boxes. Fortunately, Backstage view is from the former category of options.
Filed Under:
F
Tagged as: 01-08, File Types File Menu and Backstage View, Interface and Basics, PowerPoint Tutorials
Comments Off on File Types, File Menu, and Backstage View: File Menu and Backstage View in PowerPoint
If you are working on a presentation with your clients or even a co-worker, then you might end up in a situation where you both did not work on the same copy, one after the other. Instead, you worked on two different copies. These copies may contain changes done by you both, some similar and some different. Now you need to compare and merge these copies into a single, cohesive file without losing any edits!
Yes, you can manually compare your presentations, keeping them side by side. This option works great if there are very few changes. For anything more involved, you will want to use the Compare feature that combines two presentations provided by you, and then shows you the differences between them.
Filed Under:
W
Tagged as: 01-09, Interface and Basics, PowerPoint Tutorials, Working with Slides
Comments Off on Working with Slides: Comparing and Merging Presentations
You have already learned about picture bullets, and how you can import any picture and use it as a custom bullet. You can also create your own picture bullets to use in presentations, and these can be created right within PowerPoint!
To learn more, choose your version of PowerPoint. If we do not have a tutorial for your version of PowerPoint, explore the version closest to the one you use.
Filed Under:
B
Tagged as: 05-03, Bullets and Numbering, PowerPoint Tutorials, Text and Fonts
Comments Off on Bullets and Numbering: Create Your Own Picture Bullets in PowerPoint
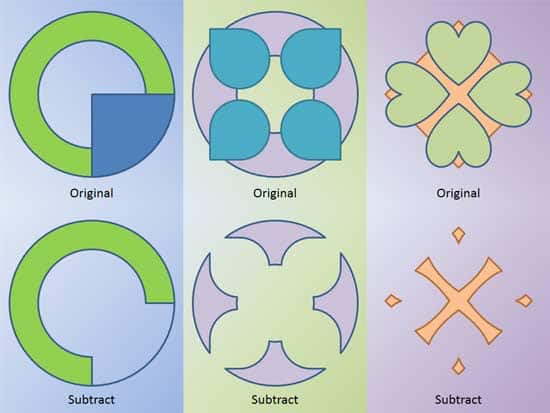
PowerPoint lets you change the appearance of merged shapes. However, don’t assume that just because this is so easy-to-use, the end results won’t be seriously impressive. Together, there are five options that let you merge shapes, and we have already explored four of them. In this tutorial, we’ll show you how you can use the Subtract option to subtract one shape (or even multiple shapes), from the first selected shape.
To learn more, choose your version of PowerPoint. If we do not have a tutorial for your version of PowerPoint, explore the version closest to the one you use.
Shape Subtract Command in PowerPoint 2016
Shape Subtract Command in PowerPoint 2013
Shape Subtract Command in PowerPoint 2010
Shape Subtract Command in PowerPoint 2016
Shape Subtract Command in PowerPoint 2011
Tutorial Code: 06 10 07
Previous: 06 10 06 Shape Intersect Command in PowerPoint
Next: 06 10 08 Convert Text to Shape by Intersection in PowerPoint
Filed Under:
M
Tagged as: 06-10, Merge Shapes, PowerPoint Tutorials, Shapes
Comments Off on Merge Shapes: Shape Subtract Command in PowerPoint
While PowerPoint does have an option to automatically compare presentations, sometimes doing this comparison manually can be actually more effective, especially when you have fewer changes in the first place. You can place both presentations side by side and compare individual slides.
Filed Under:
W
Tagged as: 01-09, Interface and Basics, PowerPoint Tutorials, Working with Slides
Comments Off on Working with Slides: Compare Presentations Manually in PowerPoint
Microsoft and the Office logo are trademarks or registered trademarks of Microsoft Corporation in the United States and/or other countries.