![]()
This is the print version of this page. All content is copyright Indezine.com 2000-2026.
![]()
Definitions and resources for terms and techniques used in the world of presentations
See Also:
PowerPoint and Presenting Notes
PowerPoint and Presenting Glossary
Presentations Glossary in alphabetical order:
A |
B |
C |
D |
E |
F |
G |
H |
I |
J |
K |
L |
M |
N |
O |
P |
Q |
R |
S |
T |
U |
V |
W |
X |
Y |
Z
Millions of pictures are available online within the Creative Commons license. Many of these pictures can be found on Flickr.
To learn more, click the link below.
Attributing Creative Commons Pictures in PowerPoint Slides

Tutorial Code: 09 11 03
Previous: 09 11 02 Searching Flickr for Creative Commons Pictures in PowerPoint
Next: 09 11 04 Creative Commons and Pictures
Filed Under:
P
Tagged as: 09-11, Picture Basics, Pictures and Visuals, PowerPoint Tutorials
Comments Off on Picture Basics: Attributing Creative Commons Pictures in PowerPoint Slides
There are a number of sites that provide royalty-free pictures that can be used in your PowerPoint presentations. However, none of these resources can match the amazing breadth and variety of picture content you can find at Flickr, a photo-sharing site.
To learn more, click the link below.
Searching Flickr for Creative Commons Pictures

Tutorial Code: 09 11 02
Previous: 09 11 01 Picture Copyrights
Next: 09 11 03 Attributing Creative Commons Pictures in PowerPoint Slides
Filed Under:
P
Tagged as: 09-11, Picture Basics, Pictures and Visuals, PowerPoint Tutorials
Comments Off on Picture Basics: Searching Flickr for Creative Commons Pictures
The adage, a picture is worth a thousand words is popular, and yet the truth of that statement may not hold good in at least one scenario: Where did the visuals or pictures used in a presentation originate from? Were copyrights respected?
To learn more, click the link below.
Picture Copyrights in PowerPoint

Tutorial Code: 09 11 01
Previous: 09 10 01 Insert Clip Art in PowerPoint
Next: 09 11 02 Searching Flickr for Creative Commons Pictures
Filed Under:
P
Tagged as: 09-11, Picture Basics, Pictures and Visuals, PowerPoint Tutorials
Comments Off on Picture Basics: Picture Copyrights
Clip Art describes any image, graph, picture, etc. PowerPoint lets you easily insert such content into your slides.
To learn more, choose your version of PowerPoint. If we do not have a tutorial for your version of PowerPoint, explore the version closest to the one you use.
Insert Clip Art in PowerPoint 2003, and 2002

Tutorial Code: 09 10 01
Previous: 09 09 02 Ungrouping Maps in PowerPoint
Next: 09 11 01 Picture Copyrights in PowerPoint
Filed Under:
C
Tagged as: 09-10, Clip Art, Pictures and Visuals, PowerPoint Tutorials
Comments Off on Clip Art: Insert Clip Art in PowerPoint
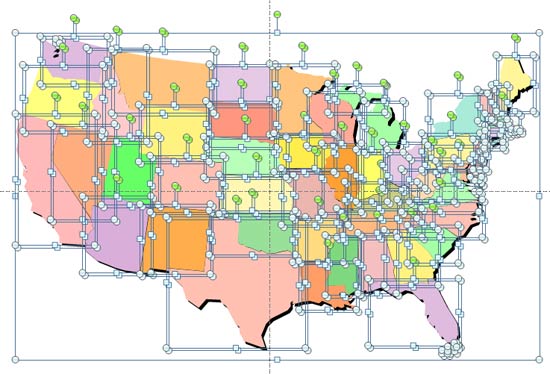
In the previous tutorial, we showed how to download vector map files from the Microsoft Office website. In this tutorial, you’ll learn how to ungroup these files. Our example looks at a map of the United States of America that also shows each individual state, your map may be different but the principles explained below will be useful.
To learn more, choose your version of PowerPoint. If we do not have a tutorial for your version of PowerPoint, explore the version closest to the one you use.
Ungrouping Maps in PowerPoint 2010 and 2007
Tutorial Code: 09 09 02
Previous: 09 09 01 Downloading Maps from the Office.com Site in PowerPoint
Next: 09 10 01 Insert Clip Art in PowerPoint
Filed Under:
M
Tagged as: 09-09, Maps, Pictures and Visuals, PowerPoint Tutorials
Comments Off on Maps: Ungrouping Maps in PowerPoint
Microsoft and the Office logo are trademarks or registered trademarks of Microsoft Corporation in the United States and/or other countries.